Why Microsoft 365 Backup and Recovery is Important

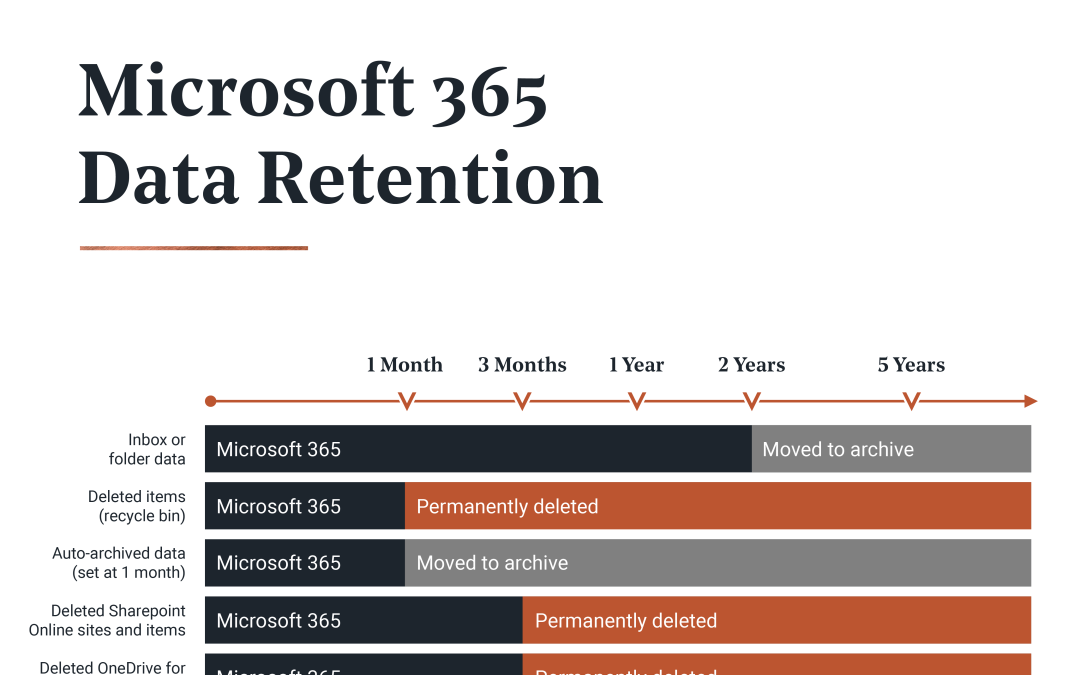
What happens if your team can’t access important business files? The impact of data loss is disruptive at best and devastating at worst. While many businesses associate data loss with cyber attacks, a lot of the time it’s a little closer to home—user error. So, how safe is your Microsoft 365 data? 

Having a Microsoft 365 backup and recovery solution in place is critical to business continuity and protection. It protects your business in a number of ways: 

  • Fast recovery from human error such as accidental or deliberate deletion 
  • Set longer retention periods than the default 90 days when a subscription ends or is terminated 
  • Protect your business data from external threats such as ransomware attacks  
  • Ensure compliance and legal requirements are met with the ability to quickly recover lost data 
  • Prevent data loss across Microsoft 365 applications such as SharePoint, Teams and Outlook 
  • Managing hybrid email deployments and migrations 

1. Recover quickly from data loss due to human error 

Human error comes in many forms including accidental deletion, deliberate deletion by an unhappy employee, or a cyber breach resulting from a threat such as successful phishing. It can take just a couple of clicks and valuable business data is lost. No matter how it happens, ensuring your business has an effective Microsoft 365 backup and recovery solution in place will prevent data loss due to human error. 

2. Set longer retention periods 

When a Microsoft 365 subscription ends, customer data is stored for 90 days. Once this period ends, all data is deleted. Depending which industry you are in, you may be required to have longer retention periods in place. And even if it’s not legally required of you, it’s always a good idea to give yourself more time to retrieve data.  

3. Protect your business against ransomware attacks 

With ransomware on the rise in Australia and around the world, it’s important to have an effective backup and recovery plan in place for your Microsoft 365 data. This plays a crucial role in strengthening your lines of defence. Ransomware usually comes from clicking a malicious link and once it gets into your business it locks or encrypts your files, demanding payment for it to be released. This can cause serious downtime and disruption to your operations.  

4. Meet compliance requirements 

While Microsoft 365 has some built-in features that allow you to collect and copy data, a purpose-built third-party backup solution still plays an important role. It can help your business better meet specific compliance and regulatory needs by allowing you to easily search and bring back data. 

5. Managing hybrid email deployments and migrations 

When adopting Microsoft 365, businesses usually need some time to transition from the legacy system. And some leave elements of the existing systems in place for flexibility and control. An effective Microsoft 365 backup solution will handle this hybrid email deployment, treating all data the same to prevent any data loss. 

Our approach to M365 backup 

At Monocera, we use a third-party application to back up email, OneDrive, SharePoint and Teams sites daily or twice a day. This backs up your data outside of Microsoft so that if something does go wrong, your data is kept safe. This service is included for our managed services clients and is also available in a prepaid model at a small fee per user to gain unlimited retention. 

If you’d like to learn more about Microsoft 365 backup and recovery get in touch! 


Why You Should Use Microsoft Office Cloud Signatures

As businesses return from their holiday breaks, email signatures are slowly being edited to remove end-of-year sales, holiday period information, and festive additions.  

Many of these businesses are unaware that this rollout can be made easier by utilising the cloud feature for Microsoft Outlook signatures, ensuring that email signatures stay consistently relevant and on-brand across every team member. 

What are Microsoft Outlook Signatures?

We’re sure you know what an email signature looks like – those branded blocks that automatically attach themselves to the bottom of company emails. This saves time and ensures that all emails are consistent and professional. 

Signatures also make it easy for businesses to include important information such as contact details, legal notices, and important links in their email signatures.  

Why Use Cloud-Based Signatures? 

One of the key benefits of using cloud signatures in Outlook is the ability to manage and update signatures centrally. Administrators can create and edit signatures for all users in the organisation, and then push out the updates to all users’ Outlook accounts.  

Cloud signatures eliminate the need for each user to manually create and update their own signatures, saving time and reducing the chance of errors. Additionally, it ensures that all emails sent from the organisation have a consistent and professional look and feel.  

Cloud signatures also allow businesses to create signatures for specific seasonal events, sales, holidays, and more, and push these out across the entire company for a specific time period. For example, if you have a July sales period, a new signature can be designed for July to incorporate relevant information that will automatically switch back on August 1st. This removes any human error from the distribution of time-specific signatures. 

Another benefit of cloud signatures is the ability to track and verify the authenticity of signatures. Each signature is generated with a unique code that can be verified by the recipient, ensuring that the signature is genuine and has not been tampered with. This is particularly useful for businesses that need to comply with particular industry regulations. 

How Monocera can set up your signatures

Monocera can coordinate your cloud-based signatures in Outlook to ensure they’re being correctly distributed to all members of your team, and to quickly update and replace signatures as required. 

Microsoft Outlook cloud signatures are a useful tool for businesses looking to streamline their email communication and improve the professionalism of their emails. With the ability to centrally manage and update signatures, track and verify authenticity, and add branding elements, cloud signatures can help businesses to improve their email communication and ensure compliance with regulations. 

Talk to our team to find out more about implementing cloud-based signatures in your business. 


Why You Should Keep Outlook’s New External Email Warning Tag

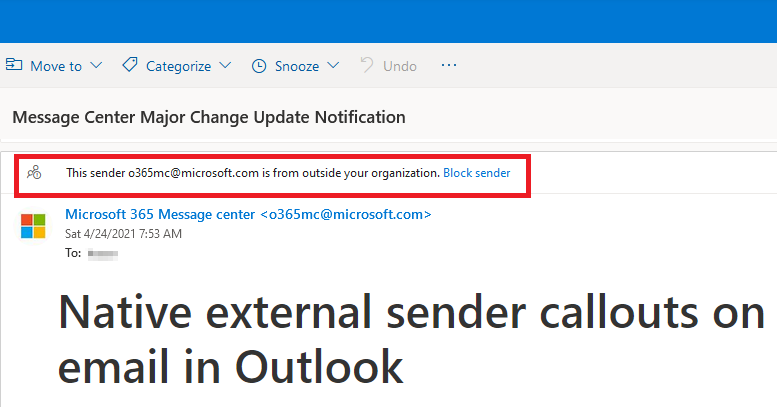
We’ve recently had several clients come to us asking to remove the external email warning tag on their business’ Microsoft Outlook.  

Our guidance, however, is that tag should be kept as its benefits far outweigh the cons. Let’s run through why.

What is the external email warning tag?

Put simply, external email warnings help alert users about malicious links and phishing emails sent from accounts outside your organisation.  

The external warning tag has been rolled out for both Windows 10 and 11, however, whether you have got the update or not depends on your combination of operating system and your Office version.  

These tags appear as a small ‘[External]’ message in the email subject line, or as a pop-up message before you can see the email body.  

Many of our clients find these warnings ugly or intrusive, yet their purpose is to make you pay extra attention to emails from outside your organisation and to be more aware of any potential malicious content.  

Screenshot of examples of Office external warning tag

Why is the external email warning tag important?

Despite clients being concerned about how their Outlook looks, or getting frustrated by the extra pop ups that appear, the benefits of these tags far outweigh the cons.  

Namely, the majority of email scams begin with messages from outside of your organisation. At an enterprise level, having a clear and prominent deterrent will help reduce scams, as staff are more aware from the outset of the potential phishing attempts and malicious links contained in the email.  

Moreover, external tagging helps prevent individuals and companies from falling into the trap of business email compromise (BEC).  

BEC scams are sophisticated attacks on both businesses and individuals – usually with the intent of conducting unauthorised transfers of funds.  

The majority of BEC attacks come through compromised user accounts. Having external warning tags should reduce compromise through attacks like password sprays, forcing attackers to find and employ new tactics.  

To put it simply, this external tagging helps protect your organisation. 

The cost of business email compromise

In the first half of 2022, the Australian Competition and Consumer Commission (ACCC) received over 11,000 reports of business email compromise, costing a total of $12.3 million. 

Furthermore, in 2021, the ACCC reported an 84% increase in cyber-attacks compared to the previous year.  

Every year, cyber criminals become more sophisticated and cyber-attacks are here to stay. Fortunately, prevention methods are also becoming more sophisticated and general awareness around these attacks are increasing as well.  

If you have any questions about external email tags, or how to better protect your business against cyber-attacks, get in contact with Monocera 


Configure MFA for m365

If you need help setting up Multifactor Authentication (MFA) for your Office 365 Account – This guide will walk you through the process.

Please note: Multifactor will need to be enabled on your account before proceeding. Let us know before continuing so we can set this up ahead of time.

Before you begin, you will need to download the Microsoft Authenticator App to your mobile phone. Go to the App Store (iPhone) or Google Play Store (Android) and download it.

Just get it downloading for now and we will come back to it.

On your computer, go to the Microsoft 365 Portal.

You will now be prompted to sign in, enter your email address and click “Next”.

Enter your password and click “Sign in”.

Click “Next”

Click “Next”

Click “Next”

Open the Microsoft Authenticator app on your phone that you downloaded earlier.

If prompted in this step, allow notifications and use of camera so you can scan the QR code in the next step. Then add an account, and select ‘Work or School’.

Note: Depending on your phone and app version, this process is slightly different but you should find the option to add an account pretty easily.

Once scanned, click “Next”

Approve the notification that was pushed to your mobile phone and Click “Next”

Once you’ve approved the sign in, click “Next”

Click “Done”

You have finished setting up MFA on your account.
If you are using the Outlook app on your computer or mobile phone, you should close and reopen it. If you get prompted to sign in again, enter the password and then approve sign-in from the push notification that will be sent to your phone. This can take a little while before you get prompted so keep an eye on this for the next 24 hours or so.


Microsoft Teams now lets you create group chats with external users.

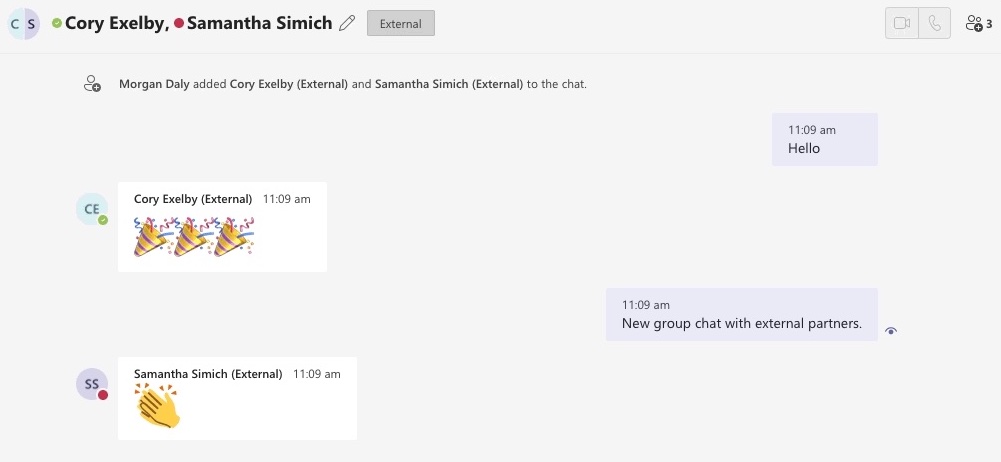
Chatting with external partners in Microsoft Teams is a fantastic productivity feature, but have you been wishing that you could have a group chat with external partners? Now you can. Last month Microsoft launched this much awaited feature. 

How?

  1. Start a new chat like you normally would.
  2. Add your chat participants both internal and external.
  3. Start chatting.

It’s basically that easy. Keep in mind that you will probably need the full email address of your external user to find them and invite them to the chat.

This new feature supports up to 250 participants across different organisations. If this feature is not working for you contact us as it might need to be enabled by an administrator for your organisation.

Group chat with external users and partners.


Configure MFA for o365

If you need help setting up Multifactor Authentication (MFA) for your Office 365 Account – This guide will walk you through the process.

Please note: Multifactor will need to be enabled on your account before proceeding. Let us know before continuing so we can set this up ahead of time.

Before you begin, you will need to download the Microsoft Authenticator App to your mobile phone. Go to the App Store (iPhone) or Google Play Store (Android) and download it.

Just get it downloading for now and we will come back to it.

On your computer, go to the Office 365 Portal.

You will now be prompted to sign in, enter your email address and click “Next”.

Enter your password and click “Sign in”.

Click “Next”

Select “Mobile app” from the dropdown menu
Select “Receive notifications for verification”
Click “Set up”

Open the Microsoft Authenticator app on your phone that you downloaded earlier.

If prompted, you can skip add account when you first open it. Along the way you will be prompted to allow access to the phone camera and other features, make sure you accept both of these permissions or you won’t be able to scan to QR code in this step. Next add an account. Depending on your phone and app version, this process is slightly different but you should find the option to add an account pretty easily. Choose the option to scan QR code. Choose “Work or School” Now scan the QR code on your computer screen. Once scanned, click “Next”

Click “Next”

Choose the country code and enter your mobile number so you can still access your account if you get locked out.
Click “Next”

Click “Finished”

You have finished setting up MFA on your account.
If you are using the Outlook desktop app on your computer, you should close and reopen it. If you get prompted to sign in again, enter the password and then approve sign-in from the push notification that will be sent to your phone.


Privacy Settings
We use cookies to enhance your experience while using our website. If you are using our Services via a browser you can restrict, block or remove cookies through your web browser settings. We also use content and scripts from third parties that may use tracking technologies. You can selectively provide your consent below to allow such third party embeds. For complete information about the cookies we use, data we collect and how we process them, please check our Privacy Policy
Youtube
Consent to display content from Youtube
Vimeo
Consent to display content from Vimeo
Google Maps
Consent to display content from Google